Mastering Wall Repairs: The Ultimate Guide to Touch Up Painting
A flawless wall is like a blank canvas that brings peace and perfection to any home. However, life happens—nails, screws, or the occasional mishap can leave unsightly holes that disrupt this tranquility. Fortunately, with the right tools and techniques, you can master the art of touch-up painting and restore your walls to their former glory. Whether a tiny puncture or a more noticeable gap, this guide will walk you through the best way to touch up paint, ensuring seamless repairs that blend perfectly with your existing interior decor.
Preparing the Wall for Touch-Up
Proper preparation is crucial before you dip your brush into the touch-up paint to ensure that the paint adheres well and the repair is invisible.
Cleaning the Area
Start by removing dust, debris, or grease from the wall with a clean, damp cloth. Allow the area to dry completely before proceeding to the next step.
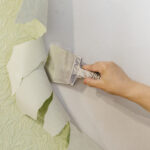
Filling the Hole
Use a quality spackle or wall filler to fill the hole, applying it smoothly with a putty knife. Once the filler dries, sand the area lightly until it’s flush with the wall. Wipe away any dust generated from sanding.
Choosing the Right Touch-Up Paint
The success of your touch-up job heavily relies on the paint itself. Here’s how to ensure you’re using the correct touch-up paint for your house.
Match the Original Paint
Use the same paint used originally on your walls for the best results. If you don’t have any leftover paint, take a small chip to your local hardware store to find the closest match.
Consider the Sheen
The finish of your paint (matte, eggshell, satin, semi-gloss, or gloss) affects how light reflects off your walls and will impact how well your touch-up blends in. Make sure the touch-up paint matches the sheen of the surrounding area.
Applying the Touch-Up Paint
Now that you’ve prepped the wall and chosen the perfect paint, it’s time to apply it.
Use the Right Tools
A fine-tipped brush can provide the precision needed for a discreet repair for small areas. For larger touch-ups, a roller that matches the texture of your wall will help blend the paint more effectively.
Technique Matters
When applying touch-up paint, less is more. Start with a thin layer and build up as needed. Feather the edges by lightly brushing or rolling away from the repair to help the new paint blend with the old.
Addressing Color Differences
Even with the perfect match, freshly applied paint can sometimes stand out against older paint. Here are tips to ensure a seamless blend.
Prime Before Painting
If you’re covering a significant repair or dark marks, applying a primer can prevent these from showing through the new paint and help unify the color.
Consider Painting the Entire Wall
In cases where touch-ups are particularly noticeable, it might be necessary to repaint the entire wall to ensure uniformity. This is often the best way to touch up paint walls when dealing with difficult-to-match colors or extensive repairs.
Maintaining Your Walls After Touch-Up
After your touch-up paint has dried, protecting and maintaining your walls can keep them looking fresh longer.
Clean Gently
Clean recently painted walls gently with a soft, damp cloth to avoid wearing away the paint.
Store Leftover Paint Properly
Seal your paint can tightly and store it in a cool, dry place. Properly stored paint can last years and be useful for future touch-ups.
Touch-up painting is an art form that requires patience, precision, and the right approach. Following these steps, you can effectively conceal holes and imperfections, leaving your walls pristine. Remember, the key to successful touch-up paint for the house interior lies in careful preparation, selecting the right paint, and mastering application techniques. With this guide, even beginners can achieve professional-looking results, ensuring their home’s interior remains beautiful and inviting for years. Whether it’s a minor scuff or a larger repair, these tips will empower you to confidently tackle wall touch-ups, preserving the integrity and aesthetics of your living space.